• Skip to primary navigation
  • Skip to main content
  • Skip to primary sidebar

Lots of Helpers

Our family's life in New Zealand

  • Home
  • Our Library
  • Math Freebie
  • Contact Us
  • Legal Policies
    • Disclosure and Disclaimer
    • Privacy Policy
You are here: Home / Archives for Homemaking

Homemaking

Soap!

August 23, 2021 by NZ Filbruns Leave a Comment

I like to make soap once a year, and make enough for at least a year. It’s a very satisfying thing to do; I can make enough for our family for a year or more and only spend about $15 and a little time.

I start by rendering fat from either sheep or cattle, whichever I can easily source. I put it in a roaster in the oven and bake it at about 150°C for several hours. As the tallow melts out of the fat, I ladle it out of a corner, then put it back in the oven. Eventually, I take a pancake turner and cut through the fat to help melt more of it out. When it’s still very hot, it needs to be in a metal bowl, and then when it cools down a bit I put it in a plastic carton and, after it’s cool, put it in the freezer until I’m ready to use it.

05-IMG_630813-IMG_630624-IMG_6310

To make the soap, I melt 13 cups of fat in a large pot. IMG_7655Then, I measure out 12 ounces of lye (caustic soda) into a dry bowl. IMG_7657Put 4 cups of cold water in a large glass dish. I always take it outside for the next step. Carefully pour the lye into the cold water, and stir with a plastic or stainless spoon (not wooden or aluminum) until the lye is dissolved. IMG_7658Now, check the temperature of the melted fat and the lye. They need to be within 10-20 degrees Fahrenheit (I can’t remember the exact number, but it isn’t too crucial) of each other. IMG_7659IMG_7660Once they are a similar temperature, carefully pour the lye water into the fat and stir. If you use a stick blender or hand mixer for this, you’ll reach the next step more quickly. IMG_7663

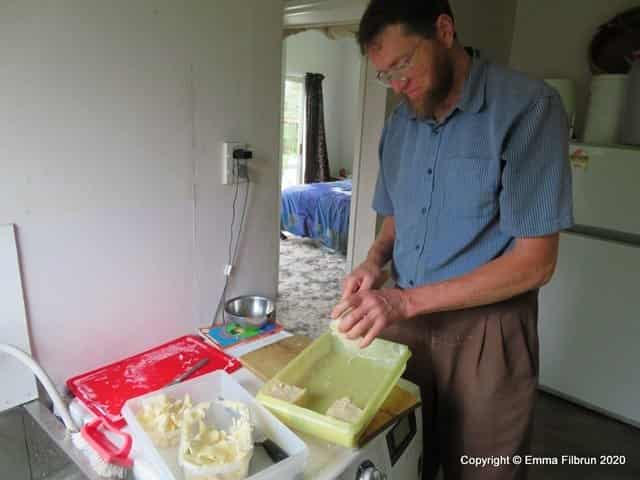
What you watch for now is called “tracing.” Tracing is simply being able to see a dribble of soap on top when you lift your spoon or the blender out and let it fall back in. Basically, as far as I can tell, it means the soap is thickening enough that it takes an instant to disappear inside again, if that makes sense. When you see tracing, it’s time to pour the soap into the molds—and with cow or sheep fat, you have to work fast, since it hardens quickly at this point! I use plastic Tupperware containers for molds. I made a double batch this year, and filled three 9”x13” containers.

IMG_7664

Now, keep the soap as warm as possible for a couple of days, so the chemical reaction between the lye and the fat will keep going. I wrap the containers up in blankets and put them close to the fire. IMG_7665

Two days later, I cut the soap. At this point, it’s still pretty soft. I used a butter knife to cut it into the size blocks we like, and then lifted them out of the containers. If I had left the soap in them for a week or two, the soap would have likely hardened enough that I could pop the whole slab out, and then cut on a cutting board.IMG_7679

I stack the bars of soap in a cardboard box, with newspaper between the layers. This will hopefully keep it drier in our damp house. We keep it in the warmest, driest place we have. We leave it sit to cure for two months to completely finish the saponification process (the chemical reaction). IMG_7680

This is the way I make soap; there are other methods. Do some research for yourself if you are interested in making soap—you’ll probably come up with a lot of tips I don’t know! If you want to make goat’s milk soap, which I do when I have goat’s milk, use it in place of the water. Just be sure to freeze it first, and then let it thaw just till slushy before adding the lye.

Filed Under: Activities at Home Tagged With: Homemaking, Soap

The Garden—January 2021

January 24, 2021 by NZ Filbruns Leave a Comment

A week ago, the garden was about the most beautiful I have ever seen! Everything was in beautiful shape. Then, we had a week of rain. We got 185 mm (7 1/2 in) of rain in 5 days, and one of the days we had gale-force winds, as well. There was hail a couple of times, too. A lot of plants, especially lettuces, got badly bruised, and the peas got knocked partially off their trellis. The runner beans got broken off at the top of their trellis. Because of the rain, the stems of a lot of plants are very brittle, so when I try to straighten them out, for example to help a runner bean up its trellis, they snap off. It could have been a lot worse, though. In Motueka, on Christmas weekend, they had about five inches of hail! I’m thankful we didn’t get that.

Here are the tomatoes. The ones in front are the South Australian Dwarfs, which don’t do well with staking but put on a prolific crop.

IMG_7516

Zucchini is in the row closest to us; the rest are pumpkins. We spread bird netting over the greenhouse for the pumpkins to climb up. IMG_7517

Inside the greenhouse. The cucumbers are nearly done. The pepper plants just to the left in the middle lived over the winter. We put a small, plastic-covered box over them so they didn’t freeze. They are loaded with chilis already, and I’ve been picking bell peppers, too.IMG_7518

Beside the greenhouse is this bed. I have dwarf (or bush) beans, and then runner beans on the trellis. We’ve had enough runner beans for a couple of meals already.IMG_7519

The other side of the trellis has cucumbers, and at the far end are some climbing zucchinis.IMG_7520

The peas have this trellis. The peak of it is about five feet high, and before the storm the plants stood up at least a foot over that. I’m trying to get them to stand up again, but I’m not sure it’ll work.IMG_7521

Corn, lettuce, beet root, leeks and onions.IMG_7522

I planted lettuces where the corn didn’t come up in this bed.IMG_7523

Lettuce, carrots, and potatoes behind them. I have dill all over the garden. We just weed out the excess, and have plenty for pickles.IMG_7524We found this giant in the garden when we came home from our big trip! Stuffed zucchini on the menu, for sure.

IMG_7502

There were a couple of large cucumbers, too.IMG_7503

This was my harvest one evening. Yum! We eat well this time of year.IMG_7512

Filed Under: Activities at Home Tagged With: Garden, Homemaking, Homesteading

Harvesting in April and May

May 24, 2020 by NZ Filbruns 1 Comment

When I dug potatoes one day, I found this funny duck-shaped one. Mr. Imagination loved it and took a picture of it.03-IMG_6197

A few days later when the boys harvested pumpkins, he brought this one in to weigh it. He was quite impressed with its size! (That’s 6.3 kilos, or around 13 pounds.)5-IMG_6212

As usual, we had a lot of green tomatoes at the end of the season. This lot was ripe and could be canned as whole tomatoes or juice: 5-IMG_3856but we also had this to deal with: 06-IMG_625409-IMG_6255

I went online to find recipes, and discovered that green tomatoes are as safe to can as ripe ones, or maybe more so, since they are more acidic. I decided to make green tomato salsa first. I didn’t follow the recipe exactly, but the changes I made would have made it safer, since I reduced the volume of peppers. This is the proportions I used; you can find the original recipe here:
1.5 kilos green tomatoes

400 gm onions

2 small HOT peppers plus several milder ones (recipe called for 250 gm; I used more like 50-100 gm)

2 cloves garlic

1/2 cup vinegar (called for lime juice, which I didn’t have)

1 teaspoon salt

1 teaspoon black pepper

I coarsely chopped the tomatoes and onions, then put the peppers and garlic in the blender with the vinegar. After adding the vinegar mixture to the pot, I mixed in the salt and pepper, then brought the whole lot to a boil. I did 4-7 times this amount in each pot, using three pots at a time. And here’s a tip if you do something like this: weigh the tomatoes after chopping, then use a dry-erase marker to write the weights on the outside of the pot. It washes off easily when you’re done, and you don’t lose track of how many batches you’re making! I just discovered that this year. After the salsa has boiled for a little while, put in jars and seal. We don’t like this for eating as salsa, but it’s great in soups. I’m planning to use it through the year when I am making a soup that I want some spice in; I won’t have to chop onions for the soup, either!

Here are the jars of this salsa that we canned. A lot of the tomatoes were half ripe, which is why it looks fairly red. (I  should mention that the reason we didn’t leave them to finish ripening was that the slugs were getting them and they would have rotted before ripening.)16-IMG_3884

I also experimented with pickling green tomatoes (results aren’t in yet), and made a few pots of half-ripe ones into juice. It’s not quite as tasty as juice from ripe tomatoes, but when I use it with ripe ones, we don’t mind it at all. Just a way to squeeze a little more production out of the garden!

All fruit and vege shops were shut down during lockdown, and we don’t have any on the Coast anyway. However, I have my own private one. One day I went out “shopping” and this was what I brought home for dinner. So much fun! I love walking out to the garden every afternoon to harvest what we need for that evening’s meal, and getting the rest from the freezer or jar room. We are rich, and I am thankful God has given us this place where we can grow so much food. (I think it’s good for my mental health as well as our physical health, too!)10-IMG_6215

Filed Under: Activities at Home Tagged With: Garden, Homemaking, Recipes

Soap

April 29, 2020 by NZ Filbruns 2 Comments

After my mention on this blog that Gayle made our year’s supply of soap while he was home during lockdown, I received a request to share my method/recipe. It’s very simple; I found it online about eight years ago when I started making soap. I just googled something like, “soap recipes with tallow.” I wanted to use tallow as the fat, since I can usually access it fairly readily by asking a butcher for it. Then, I render it.

So, I guess I should start with the rendering instructions! Sorry, I don’t have pictures of any of this; I don’t do it very often, and haven’t thought to document that part of my life! I get the fat from the butcher. Usually I use beef fat, but I’ve also used sheep fat when we butchered our own sheep and they turned out to be very fat. I put the pieces of fat in a large roaster and put it in the oven at, maybe, 150°C. I think that might be about 325-350°F? Once a lot of the fat has liquified, I ladle it out, then roughly chop up the pieces of fat with a pancake turner. I put it back in the oven and roast it again; a lot more of the fat comes out. When I think it’s pretty well done, I just drain off all the liquid fat I can, before it solidifies.

Another way I get fat is by making bone broth. I get beef bones from the butcher, and roast them for half an hour or so in the oven. Then, I put them in my huge stock pot, cover with water and a splash of vinegar, and simmer for a day or two. Then, I strain the bones out of the hot broth and discard them, and chill the broth. The fat all rises to the top and solidifies. If the weather is cold enough I can set the pot outside (with a good lid to prevent cats from getting in it) overnight; otherwise, I try to fit it in the fridge. I carefully lift off the solid fat and scrape the goopy stuff off the bottom, then put the fat in a large saucepan. I heat it till it’s melted, and then simmer till it stops spitting—that way I know the water is all cooked out of it and it’ll keep a lot longer. Just be careful not to let it cook past that point, or it starts smoking. Let it cool before pouring into a container, if the container is plastic!

Now that the fat is ready, the soap can be made! I use 13 cups of tallow. Put it in a large stockpot and heat till it’s melted. Weigh out your sodium hydroxide/caustic soda/lye—you need 12 ounces for this recipe. DON’T LET IT GET WET YET! Measure 4 cups of cold water into a glass container. I use a glass roaster. Do not use plastic or metal for this step. If you want to use goats milk, put 4 cups of it into the freezer the day before soap making, and let it thaw till just slushy. Carefully pour the lye into the water or the slushy goats milk, and stir with a stainless steel spoon until it is all dissolved—don’t let it splash. This solution is very dangerous if it touches any skin. If it touches wood, it eats it up. I always do this step outside. Once the lye is dissolved, check the temperature of the lye solution and of the fat. They need to be fairly close together in temperature. I think the recommendation is within 5-10°F. If you’re using tallow, either beef or sheep, you need it to be warmer than if you are making olive oil or coconut oil soap, as the tallow solidifies a lot sooner than the other fats.

When the two ingredients are fairly close in temperature, carefully pour the lye into the tallow and stir. Keep stirring until it traces. You can bring it to that point a lot faster if you use a stick blender to stir. Gayle ran the stick blender for a minute or so, then turned it off for a couple of minutes to rest the motor, then turned it on again for another minute. I think it only took about ten minutes to trace, but I’m not sure—it was a busy morning!

Deciding when the soap is tracing is a bit tricky. To check for it, dip a spoon or spatula into the liquid soap and drizzle a bit across the top. If you can see it for an instant before it disappears, that’s tracing. Then, pour it into the molds quickly, before it sets. I use Tupperware 9×13 containers. Use whatever you have. If you have real soap molds that make pretty bars, so much the better—I don’t, so I make a very basic bar.

Keep the soap as warm as possible for a few days. We stacked up the three containers of soap and wrapped them in several woolen blankets, then put them in the warmest place we could find. It needs to stay warm for awhile for the chemical reaction to keep working, turning that fat into fat-cutting soap!

After a few days, you can take the soap out of the molds and cut it into bars. Gayle made the soap on Friday; on Monday when he opened the containers, it was still too soft to pop it out. I usually don’t get to this job for a couple of weeks, and by then the soap is hard enough to pop out the whole slab. Instead, Gayle used a table knife to cut it into bars, then a cake server to lift them out. When it sits in the containers long enough to harden, I cut it on a cutting board with a large knife. We like bars about half the size of the ones  you buy, but you can make them any size and shape you want! Save the little bits; mix them with water later (whiz with a stick blender) and you’ll have liquid hand soap or shampoo. For now, though, let all that soap age a month or two to finish the chemical reaction. I’ve heard that a month is good, but two is better before using it, to make sure your skin doesn’t react with the lye. We store the soap in a cardboard box lined with newspaper, with newspaper between layers and space between the bars. We keep the box on top of the water heater where it’s warm and dry, because we’ve had it go moldy when stored under the bathroom sink, where it was cold and damp. When stored above the water heater, we have kept it with no problems for two years.

This soap doesn’t smell pretty like the ones you buy, but we like that there is no artificial fragrance in it. I get headaches from fragrances, and sometimes itch all over after using commercial soap for a shower. This is the soap most of us use for shampoo, as well as handwashing and bathing/showering. I rub a bar over my wet hair, then use my hands to lather it. Doing this two or three times gets my hair nice and clean. Gayle and some of the boys prefer to make it into shampoo by blending bits and pieces with lots of hot water. Esther, on the other hand, can’t manage her hair if she uses this soap to wash it, so she buys her shampoo. So, depending on hair type, it may or may not work for you.

There is a lot of information online about soap making, with pictures or videos showing tracing. Do some more research and see what other people have to say! I was very thankful for a friend who walked me through my first batch of soap—this was something I was a bit scared to try. It’s not nearly as dangerous as I thought it would be, though.

Filed Under: Activities at Home Tagged With: Homemaking, Soap

The Garden This Week

February 8, 2020 by NZ Filbruns 4 Comments

The garden is at its peak as far as beauty this week. It is so lush and green! We’ll probably get more of a harvest in another couple of weeks than we are now, but by then it won’t be as beautiful, so I took some pictures this week of what I get to enjoy.

This was my harvest on Wednesday afternoon: zucchini, cucumbers, spring onions, beetroot, radishes, lettuce, green and purple beans, basil, a cabbage, and a kohlrabi.

02-IMG_3519

As you walk into the garden between the garage and the container, this is the first garden patch you come to. There are climbing sugar snap peas and runner beans along the side of the container, and beyond that is a tomato patch. The sunflower/cosmos “house” is just past them, and there are pansies planted in the top of the stump. Next is a bed of cabbage and broccoli, with some calendula in it. I also have a few tomatillos and ground cherries in that bed, but you can’t see them in this photo. The next bed has a few cucumbers at this end, then cauliflower, kohlrabi, silverbeet, and then kale. The second photo shows that bed better; past the kale is the old lettuce bed, which needs cleaned out, and then cabbage. On the other side of the path is a patch of cucumbers and corn, and there are self-seeded pumpkins here and there. The turkey run is on the other side of the fence, past the corn.

03-IMG_3520

Turn around, and past the red currants, you’ll see this patch of tomatoes and green beans, with cucumbers at the far end. The greenhouse is beside them. The pink/lavender building is the back side of our garage; the building in the back middle of the picture is the neighbor’s workshop, where they maintain their fleet of tractors and other agricultural equipment. Our three youngest have been putting water in the yellow bathtub and playing in it.05-IMG_3522

Go into the greenhouse through the south door and this is what you see. To the left is a large, self-seeded South Australian Dwarf tomato plant, then a few okras, and then my peppers and chilis.06-IMG_3523

To the right are the cucumbers, which I’m training up on strings. 07-IMG_3524

Just past the cucumbers is a small patch of rockmelons, and then some tomatoes and basil.08-IMG_3525

Next, there are a few beetroots, and then more tomatoes and basil.09-IMG_3526

On the left, past the peppers, are eggplants. I’m not sure what the tall plant is. It masqueraded as an eggplant when it was tiny, but now it looks like a nightshade. I’m waiting to see what the fruits look like when ripe before deciding on its fate. 10-IMG_3527

Past the eggplants, there are a few cabbages, then this silverbeet left from last winter, and then a tomatillo, tomatoes, and basil. On the right are a few carrots, more tomatoes and basil, and then a patch I planted in carrots (although they aren’t coming up) and two or three borage plants that grew when I gave up on them germinating and dumped the pots!11-IMG_3528

Come out of the north door of the greenhouse, turn left, and this is what you see. The first bed is beetroot, then spring onions and leeks at the far end, with a cosmos or two and some dill. Next is a small patch of potatoes and the onion patch, with dill in it, too. Close at hand, on the far right, is a Daikon radish that went to seed. The bees love it!12-IMG_3529

There is a small patch of lettuce at the corner of the potato patch.13-IMG_3530

The next bed over is mostly potatoes, and then we have a patch of broccoli and lettuce, with a few corn plants separating them from more potatoes. The last bed in this part of the garden is the corn.14-IMG_3531

Looking back toward the greenhouse and the garage. The white building on the other side of the dill is the chook coop (or turkey coop, right now). The plants with white flowers, sprinkled through the potatoes and onions, are coriander (cilantro) that self-seeded and is now going to seed again. I’m going to try to save the seeds.15-IMG_3532

These green beans and lettuce are at the end of the third patch of potatoes.16-IMG_3533

This is the far corner of the garden; these are the pumpkin plants.17-IMG_3534

On the other side of the path, behind the magnolia tree, is the zucchini patch, and the rest of the tomatoes. The turkey run is that fence past the tomatoes.

18-IMG_3535

Here are the turkeys! The white one is the tom; the others are hens. We also have a white hen. She’s sitting on eggs at the moment, at the other end of the run. There are two more nests, too; I was informed yesterday that another hen is setting now.

19-IMG_3536

We’ve had a dozen turkeys hatch this year; five have survived the weather. They’re getting pretty big already.

20-IMG_3537

I also have a couple of small garden spots by the house, just outside our bedroom. It’s sunny and sheltered here, and handy to the kitchen, so I have my herbs here. This one has celery, parsley, basil and rosemary, and some flowers. There’s also a tomato that snuck in with a basil!

26-IMG_3556

On the other side is this patch, with more basil, some silverbeet, calendula, nasturtiums in the bathtub, and still more tomatoes! Little Miss is loving picking edible flowers for our salads. We’ve been using calendula, nasturtiums, pansies, and borage. So fun to dress up a salad that way! The boys are disgusted, though. They like plain lettuce.

27-IMG_3557

I am thoroughly enjoying the garden right now. We were able to get so many grass clippings this spring that weeds have been minimal, and the boys weeded the rest of it. We’ve also had a nice amount of rain (since the monsoon came to an end in early December and allowed things to start growing!), and with all the mushroom compost we bought, everything is doing well. What a blessing!

Filed Under: Activities at Home Tagged With: Garden, Homemaking, Homesteading

My New Greenhouse!

June 8, 2019 by NZ Filbruns 2 Comments

My boys spoil me. They do so many things for me, and I just have to keep wondering how in the world I ended up with such wonderful sons! The most recent big project was building a greenhouse. When we lived in Cheviot, we were given the frames for two greenhouses, from two different people. We used one for a couple of seasons, and Simon assembled the other but it didn’t get covered with plastic before we moved and had to dismantle it again. They were two different shapes, but when the boys started working on erecting them here a month or two ago, they figured out how to put them together to make one long high tunnel, about 40 feet by 10 feet (13.5 m by 3.5 m)! The next hurdle was to cover them. After some searching, they found the old plastic from the hoophouse, and the new plastic we had bought for the other one. They were able to cobble them together and cover everything except the lowest part of one side; Gayle built a device for rolling up the lower couple of feet of plastic on the other side, for ventilation during the summer. We bought sheets of clear plastic to finish the part we didn’t have plastic for, and they built frames for them, and hinged the frames so they can be opened in the summer, as well. Now, I’m enjoying having salads growing in there for at least part of the winter! Here are a couple of photos of the boys working on tacking down the plastic.

4-IMG_56696-IMG_5671

This was a peek inside, during construction.

5-IMG_5670

….and a view from the same place, this week!

3-IMG_5738

This is a close-up of the bed right inside the door. I found a new-to-me variety of radishes called German Giant. They were advertised as getting large without getting pithy, and not going to seed so quickly. So far, they’re living up to their promise—I’ll sure be interested to see how they work in the summer! We’re really enjoying having radishes on our salads.4-IMG_5740

We transplanted the lettuces on the left into the ground here right after the framework was erected, and have been eating salads from that bed for a month now. I set out the lettuces, bok choy, and other things on the right a couple of weeks ago, and we’ll start eating them soon.5-IMG_5741And, here’s a fun picture! I found this leaf one day when I was washing lettuce. It was two leaves grown together! It’s hard to tell, but the midribs were stuck to each other. I had never seen one like this before.

1-IMG_5737

Filed Under: Activities at Home Tagged With: Garden, Greenhouse, Homemaking

Odds and Ends From February 2019

March 30, 2019 by NZ Filbruns 1 Comment

One evening, I took the camera down the hill to where I milk. We are deeply grateful to a local man for allowing us the use of this large paddock, and Poppy appreciates all the grass in it! Pansy has her own fenced-off corner to keep her from direct contact with her mother (for obvious reasons), but they can be fairly close. Notice the mountains across the river? I enjoy seeing them in all their different moods.

01-IMG_546602-IMG_546703-IMG_546804-IMG_5471

To get into the paddock, we cut across the fence near the top of the hill, using this stile that my boys built (on the suggestions of the property owner). Then, we scramble carefully down a very steep hill.

05-IMG_5472

I wanted to make lasagna one day, so Mr. Imagination helped me make the noodles. Yum!

07-IMG_547508-IMG_5480

This was one of our first big pickings of tomatoes. Last week’s, about a month after this photo was taken, we got about twice as many as are in this picture! We’re very thankful for such a good harvest from our 104 plants. Today, I’m making the third enormous batch of salsa, since my big boys eat so much. We just happen to have very spicy peppers this year, which makes the flavor they enjoy, so the popular vote this week was to make salsa instead of bottling whole tomatoes and juice. We had about 110 pints from the first two batches; I think we’ll have 60-70 more after today. Hope that’s enough! Hard-working teenage boys eat a lot, and one of them was eating it by the cupful when I asked for taste-testers this morning. Notice the pink and black tomatoes? We had a bumper crop from our heirloom plants this year. We’re loving eating those super-tasty ones!

09-IMG_5482

Little Miss is watching me write this. She wanted me to write down her story, too: The man was picking apples. Then he saw the big, bad wolf, and then he made a brick house quickly and then he went in it and the big, bad wolf said, “Let me come in, let me come in.” Then the guy said, “No,” and then the big, bad wolf said, “Well, then, I will huff and I will puff and I will blow your house in.” Then he huffed and he puffed and he couldn’t blow the man’s house in. He said, “There’s a farmer’s tree down the road. Will you get up at 6:00 in the morning and come with me to the farmer’s?” The end.

Filed Under: Activities at Home Tagged With: Cow, Garden, Homemaking, Random Photos

Garlic

January 9, 2019 by NZ Filbruns Leave a Comment

Two friends have asked me in the last few weeks how I braid garlic and onions. I happened to have a pile of garlic that I decided to braid this morning, and after I got started thought it would be a good chance to show how I do it, for those who were curious.

Start by fastening three heads together. I usually use string, but rubberbands were handier this morning, so that’s what I used this time.

2-IMG_5332

Braid a few times, then start adding in another head with each braid.

3-IMG_5333

Continue till it’s long enough, and then stop adding more. Braid a little farther without adding any, and then tie it off.

4-IMG_5334

Here are my finished braids of this year’s skimpy crop (I think it was a combination of poor soil and not enough sunshine where we put it), and I’ll have the boys hang them in the food storage room later.

5-IMG_5335

The softneck garlic I used to grow in Michigan was easier to braid, but I’ve learned that it’s possible with this hardneck garlic as well. When we want to use some, we’ll just cut or twist off a head.

Filed Under: Activities at Home Tagged With: Garden, Homemaking

April 2017 Pictures

May 30, 2017 by NZ Filbruns Leave a Comment

Time to get caught up with the random pictures!

Remember that post I did about salsa? After I added all the other ingredients, I ended up with two pots full!

34-IMG_22634-IMG_2288

Does Little Miss look like she has gained some weight? We were given a big boxful of shoes, gumboots, and a few dresses, her size or a little smaller. She wanted to wear all the dresses at once, so she has five dresses on in this picture!

33-IMG_2261

One afternoon when everyone was away except her and me, she found this sunflower head and sat herself down to pick the seeds out. She got a handful before she got tired of it.

31-IMG_2259

Yes, this is me laughing. I had sent a text to Gayle at work, and although he got an advertising text sent him just before that, he didn’t see mine. So, I sent him another, and we were all laughing about the ridiculousness of the whole thing.

30-IMG_2256

Gayle reading my text.

29-IMG_2255

One of our favorite meals—straw hats.

27-IMG_225128-IMG_2253

Little Miss

26-IMG_2244

What to do with an empty chips bag—tape it shut tightly, then pop it with a bang! Boys….

25-IMG_2242

We didn’t have a hard frost till early May, but I picked all the peppers the end of April. These were all from the greenhouse. I was astounded; I hadn’t thought they did so well this year!

5-IMG_2290

This silly cat is always looking for a new spot to sleep.

3-IMG_2284

I’m fixing my bicycle!

2-IMG_2283

Gayle took the boys to the beach to get some sand, so the sandbox is full again. It’s been quite popular—although I’m glad the main popularity only lasted a couple of days; a lot was tracked into the house during those days.

1-IMG_2278

Mr. Diligence and Little Miss mowing lawn.

2-IMG_2184

Mr. Inventor, Little Miss, and Mr. Diligence all mowing at once.

1-IMG_2181

Filed Under: Activities at Home Tagged With: Canterbury, Cheviot, Homemaking, Miller Street house, Random Photos

Salsa

April 21, 2017 by NZ Filbruns Leave a Comment

I started a batch of salsa a few days ago. I had nearly a bushel of tomatoes that were going bad, so I trimmed them all and ground them with the stick blender. It filled this 20-litre pot about 2/3 full! I boiled it that evening. Yesterday, I got a few peppers chopped and put in, and boiled it again. Tonight, I picked a dishpanful of tomatillos and chopped them and put them in…and brought it to a boil again! Maybe tomorrow I can finish the job. Think the pot is full enough?! I’m planning to divide it into two pots tomorrow before adding more peppers, jalapenos, onions, and some tomato paste. This is the second batch of salsa for the year, but the other wasn’t this big. Yes, we go through a lot of salsa around here.

IMG_2257

Filed Under: Activities at Home Tagged With: Homemaking

  • « Go to Previous Page
  • Page 1
  • Page 2
  • Page 3
  • Page 4
  • Interim pages omitted …
  • Page 8
  • Go to Next Page »

Primary Sidebar

  • RSS Feed
  • Facebook
  • YouTube
  • Goodreads

Recent Posts

  • December 2026 Photos
  • Book Review–Plague of Lies
  • Tramp to Cone Creek
  • November 2026 Photos
  • New in the Library! January 2026

Archives

Disclosure

Some links on this site are affiliate links.

Subscribe to the Blog

/* real people should not fill this in and expect good things - do not remove this or risk form bot signups */

Intuit Mailchimp

The Family:


Dad and Mom (Gayle and Emma)

Girl #1, Esther, my right hand

Boy #1, Seth (Mr. Handyman)

Boy #2, Simon (Mr. Inventor)

Boy #3, Mr. Intellectual

Boy #4, Mr. Diligence

Boy #5, Mr. Sweetie

Boy #6, Mr. Imagination

Girl #2, Little Miss

Girl #3, Miss Joy

Book Reviews Website

IgniteLit

COPYRIGHT © 2026 · TWENTY SEVEN PRO ON GENESIS FRAMEWORK · DISCLOSURE & DISCLAIMER · PRIVACY POLICY