
After my mention on this blog that Gayle made our year’s supply of soap while he was home during lockdown, I received a request to share my method/recipe. It’s very simple; I found it online about eight years ago when I started making soap. I just googled something like, “soap recipes with tallow.” I wanted to use tallow as the fat, since I can usually access it fairly readily by asking a butcher for it. Then, I render it.
So, I guess I should start with the rendering instructions! Sorry, I don’t have pictures of any of this; I don’t do it very often, and haven’t thought to document that part of my life! I get the fat from the butcher. Usually I use beef fat, but I’ve also used sheep fat when we butchered our own sheep and they turned out to be very fat. I put the pieces of fat in a large roaster and put it in the oven at, maybe, 150°C. I think that might be about 325-350°F? Once a lot of the fat has liquified, I ladle it out, then roughly chop up the pieces of fat with a pancake turner. I put it back in the oven and roast it again; a lot more of the fat comes out. When I think it’s pretty well done, I just drain off all the liquid fat I can, before it solidifies.
Another way I get fat is by making bone broth. I get beef bones from the butcher, and roast them for half an hour or so in the oven. Then, I put them in my huge stock pot, cover with water and a splash of vinegar, and simmer for a day or two. Then, I strain the bones out of the hot broth and discard them, and chill the broth. The fat all rises to the top and solidifies. If the weather is cold enough I can set the pot outside (with a good lid to prevent cats from getting in it) overnight; otherwise, I try to fit it in the fridge. I carefully lift off the solid fat and scrape the goopy stuff off the bottom, then put the fat in a large saucepan. I heat it till it’s melted, and then simmer till it stops spitting—that way I know the water is all cooked out of it and it’ll keep a lot longer. Just be careful not to let it cook past that point, or it starts smoking. Let it cool before pouring into a container, if the container is plastic!
Now that the fat is ready, the soap can be made! I use 13 cups of tallow. Put it in a large stockpot and heat till it’s melted. Weigh out your sodium hydroxide/caustic soda/lye—you need 12 ounces for this recipe. DON’T LET IT GET WET YET! Measure 4 cups of cold water into a glass container. I use a glass roaster. Do not use plastic or metal for this step. If you want to use goats milk, put 4 cups of it into the freezer the day before soap making, and let it thaw till just slushy. Carefully pour the lye into the water or the slushy goats milk, and stir with a stainless steel spoon until it is all dissolved—don’t let it splash. This solution is very dangerous if it touches any skin. If it touches wood, it eats it up. I always do this step outside. Once the lye is dissolved, check the temperature of the lye solution and of the fat. They need to be fairly close together in temperature. I think the recommendation is within 5-10°F. If you’re using tallow, either beef or sheep, you need it to be warmer than if you are making olive oil or coconut oil soap, as the tallow solidifies a lot sooner than the other fats.
When the two ingredients are fairly close in temperature, carefully pour the lye into the tallow and stir. Keep stirring until it traces. You can bring it to that point a lot faster if you use a stick blender to stir. Gayle ran the stick blender for a minute or so, then turned it off for a couple of minutes to rest the motor, then turned it on again for another minute. I think it only took about ten minutes to trace, but I’m not sure—it was a busy morning!
Deciding when the soap is tracing is a bit tricky. To check for it, dip a spoon or spatula into the liquid soap and drizzle a bit across the top. If you can see it for an instant before it disappears, that’s tracing. Then, pour it into the molds quickly, before it sets. I use Tupperware 9×13 containers. Use whatever you have. If you have real soap molds that make pretty bars, so much the better—I don’t, so I make a very basic bar.
Keep the soap as warm as possible for a few days. We stacked up the three containers of soap and wrapped them in several woolen blankets, then put them in the warmest place we could find. It needs to stay warm for awhile for the chemical reaction to keep working, turning that fat into fat-cutting soap!
After a few days, you can take the soap out of the molds and cut it into bars. Gayle made the soap on Friday; on Monday when he opened the containers, it was still too soft to pop it out. I usually don’t get to this job for a couple of weeks, and by then the soap is hard enough to pop out the whole slab. Instead, Gayle used a table knife to cut it into bars, then a cake server to lift them out. When it sits in the containers long enough to harden, I cut it on a cutting board with a large knife. We like bars about half the size of the ones you buy, but you can make them any size and shape you want! Save the little bits; mix them with water later (whiz with a stick blender) and you’ll have liquid hand soap or shampoo. For now, though, let all that soap age a month or two to finish the chemical reaction. I’ve heard that a month is good, but two is better before using it, to make sure your skin doesn’t react with the lye. We store the soap in a cardboard box lined with newspaper, with newspaper between layers and space between the bars. We keep the box on top of the water heater where it’s warm and dry, because we’ve had it go moldy when stored under the bathroom sink, where it was cold and damp. When stored above the water heater, we have kept it with no problems for two years.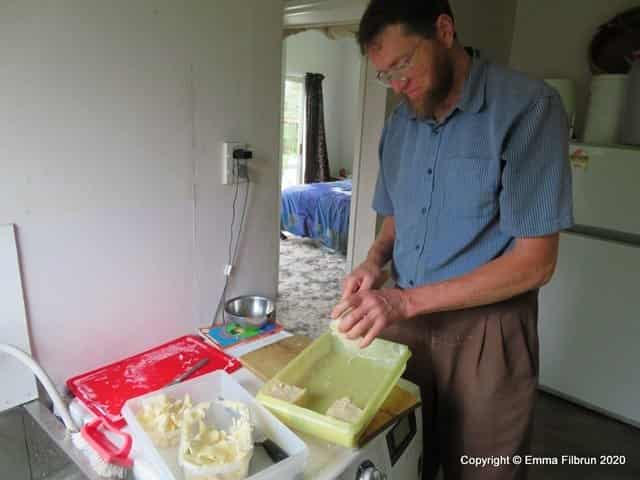
This soap doesn’t smell pretty like the ones you buy, but we like that there is no artificial fragrance in it. I get headaches from fragrances, and sometimes itch all over after using commercial soap for a shower. This is the soap most of us use for shampoo, as well as handwashing and bathing/showering. I rub a bar over my wet hair, then use my hands to lather it. Doing this two or three times gets my hair nice and clean. Gayle and some of the boys prefer to make it into shampoo by blending bits and pieces with lots of hot water. Esther, on the other hand, can’t manage her hair if she uses this soap to wash it, so she buys her shampoo. So, depending on hair type, it may or may not work for you.
There is a lot of information online about soap making, with pictures or videos showing tracing. Do some more research and see what other people have to say! I was very thankful for a friend who walked me through my first batch of soap—this was something I was a bit scared to try. It’s not nearly as dangerous as I thought it would be, though.
Thank you for that great description! I render tallow for candles etc, so got that part down 🙂 I have looked at a lot of soap recipies but found them rather intimidating. Your write up makes it seem very doable. It is so hard to find “clean” soap and buying a basic fat/lye soap from home crafters gets pretty expensive. I appreciated this!
Glad it’s helpful! I hope you have a good experience making your own soap. It’s not nearly so hard as it sounds, and definitely cheap. I can make all the soap we need for a year for our family for under $20 NZD.